Setup SMTP Mail for Website
SMTP Mail for your website enables you to send authenticated email for improved delivery to your users.
Why It's Important
- Due to sender verification changes, it's crucial to set up an SMTP user within your website CMS.
- Failing to do so may result in missed opportunities from website forms, unreceived support ticket requests, and clients not receiving password resets.
- With some email services or gateways, you may not be allowed to change the from address to something different than the username for security reasons. If this the case you won't be able to change the from address on emails coming from the website.
- If you have advanced features such as limiting allowed IP addresses that have access to use your SMTP mailer account, consider adding your web server's IP address to this type of conditional or firewall rule.
- Keep your passwords safe! If you plan to have our team configure SMTP for you, please do not plain text email this information to us.
- You must submit a form from https://www.directive.com/secure-submit or perform the installation internally.
Joomla SMTP Setup
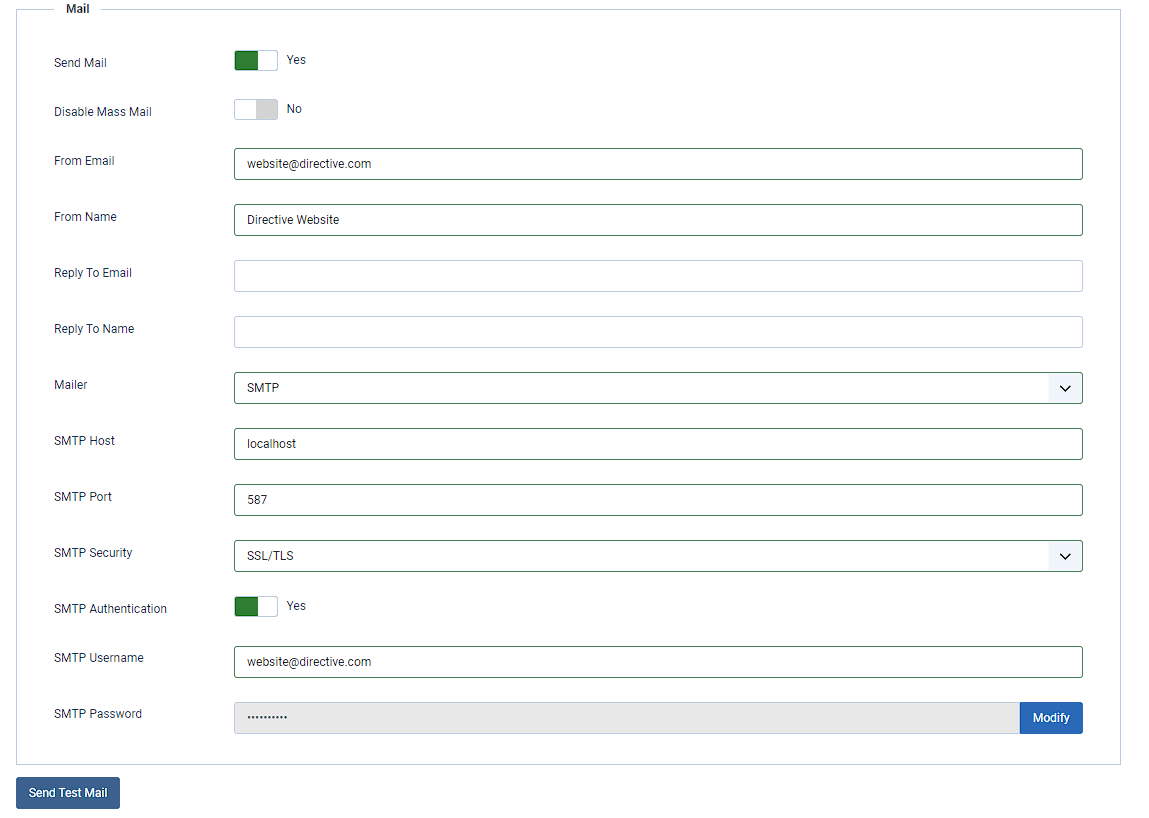
To set up SMTP authentication with your Joomla website, you can follow these steps:
- Log in to your Joomla website as an administrator.
- Go to "Global Configuration" from the main menu.
- Click on the "Server" tab.
- Scroll down to the "Mail Settings" section and select "SMTP" as the Mailer.
- In the "SMTP Host" field, enter the hostname of your SMTP server (e.g., smtp.gmail.com).
- In the "SMTP Port" field, enter the port number for your SMTP server (e.g., 587 for TLS or 465 for SSL).
- In the "SMTP Security" field, select "TLS" or "SSL" depending on the encryption method used by your SMTP server.
- In the "SMTP Authentication" field, select "Yes" to enable SMTP authentication.
- In the "SMTP Username" field, enter your full email address.
- In the "SMTP Password" field, enter the password for your email account.
- Save the changes and test the SMTP connection to ensure that it is working properly.
WordPress SMTP Setup
To set up SMTP authentication with your WordPress website, you can follow these steps:
- Log in to your WordPress website as an administrator.
- Install and activate an SMTP plugin such as WP Mail SMTP.
- Go to the plugin settings page and enter the SMTP server settings for your email service provider. This usually includes the hostname, port number, encryption method, and authentication method.
- Enter your email account credentials in the SMTP username and password fields.
- Save the settings and test the SMTP connection to ensure that it is working properly.
Self Hosted Server Instructions
Does your server support SMTP mailing? Directive web servers already support it!
If you are on a Directive server, we have removed the block so you CAN use an SMTP account to send mail from your webserver. You still need to gather the credentials and update your website content management system.
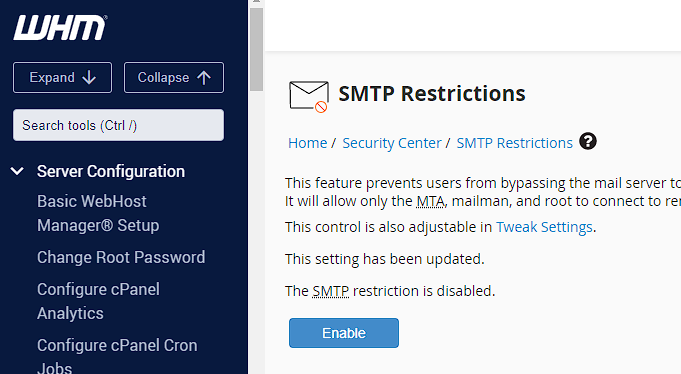
Hosting/WHM/cPanel SMTP Restrictions
To allow SMTP mail for WHM (Web Host Manager), you can follow these steps:
- Log in to WHM as the root user.
- Go to the "Service Configuration" section and click on "Exim Configuration Manager".
- In the "Basic Editor" tab, scroll down to the "ACL Options" section.
- Find the "acl_smtp_mail" option and set it to "accept".
- Click on "Save" to save the changes.
- Test the SMTP mail functionality to ensure that it is working properly.
By following these steps, you should be able to allow SMTP mail for WHM and enable email sending from your server. It's important to ensure that you have configured your email settings properly and that your email service provider allows SMTP mail from your server to avoid any issues with email delivery.
Also ensure your host has removed any firewall blocks for port 587 / 465 or 25 depending on your setup. For example, Office 365 will use authenticated SSL/TLS over 587 or 465.
The OpenSSL extension needs to be enabled in PHP. The details can be found on the php.net Installation page. The SSL module does not need to be enabled in Apache.
Create SMTP User - Office 365
- For Office 365, navigate to 365 Admin Portal -> Exchange -> Create a Shared Mailbox User. Create the user.
- Navigate back to the "Users" page on the 365 Admin Portal, open the newly created user, assign a license, and save. You will come back to this page in a few minutes after the mailbox and mail settings populate. Ensure you have the appropriate licensing for the type of usage.
- In the user dashboard select "Multi-Factor Authentication, and enforce it on this account. If you have Conditional Access enabled, you may have MFA enforced for everyone based on this policy. You can check from this portal. If you have Legacy per-user MFA still enabled, you will use this portal.

- You should be able to go back into the user account again, select "Mail" as seen below and select "Manage email apps". From this page, you will want to allow Authenticated SMTP.
- If your organization uses Security Defaults or Conditional Access policies and has issues with enabling Authenticated SMTP, you can follow this document and PowerShell command to enable this function for individual mailboxes. Enable or disable SMTP AUTH in Exchange Online | Microsoft Learn
- After you are connected via PowerShell the command you are looking to use is below but replace the UPN with the user you wish to enable SMTPClientAuthentication for.
Set-CASMailbox -Identity sean@contoso.com -SmtpClientAuthenticationDisabled $false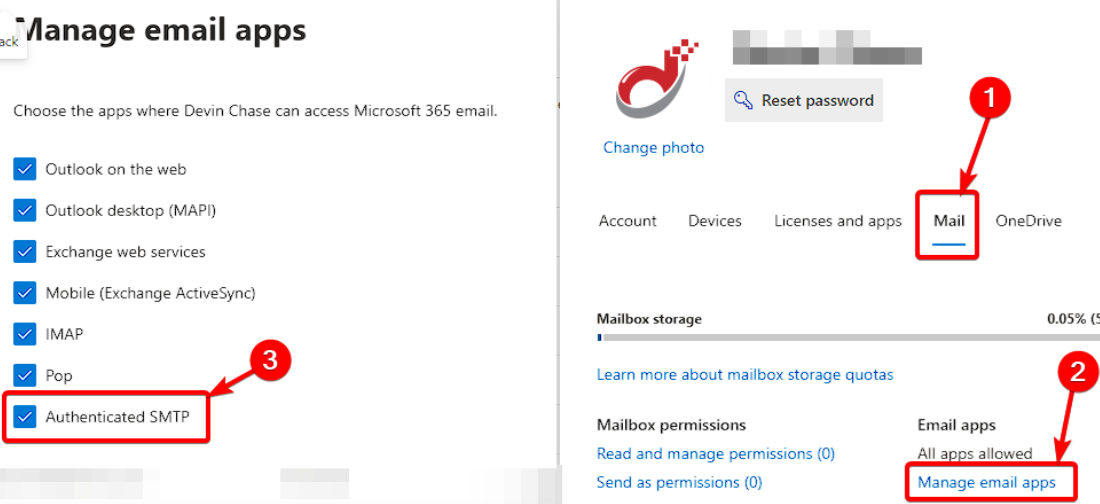
- After you create the shared mailbox, navigate to either the Microsoft Entra Portal or Azure Portal, then Users, and select the shared mailbox user you just created to set a temporary password.
- Reload the Microsoft Login page in an incognito window or another browser and login with the shared mailbox username and password you just set. You may be prompted to immediately change this password.
- After you are logged in with your newly changed password, depending on your organization's MFA settings (Conditional Access policy or Legacy per-user MFA), you will be forced to set up your two-factor options on this page.
- Once you have set up your two-factor options for the account, navigate over to "View Account" from the top right (click your profile icon), then go to "Security Info" and add a sign in method using "App Password" as the option.
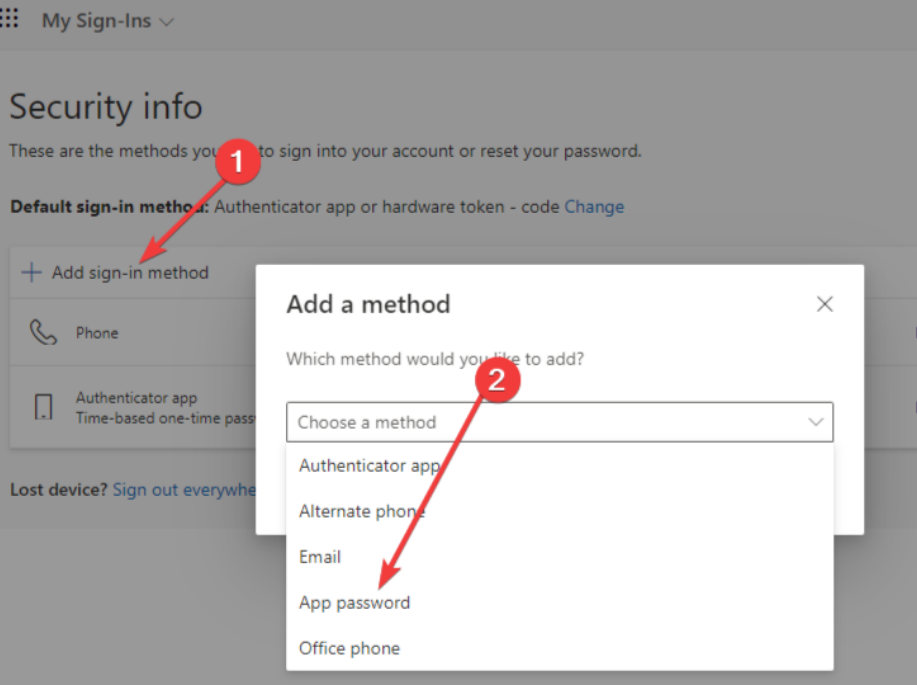
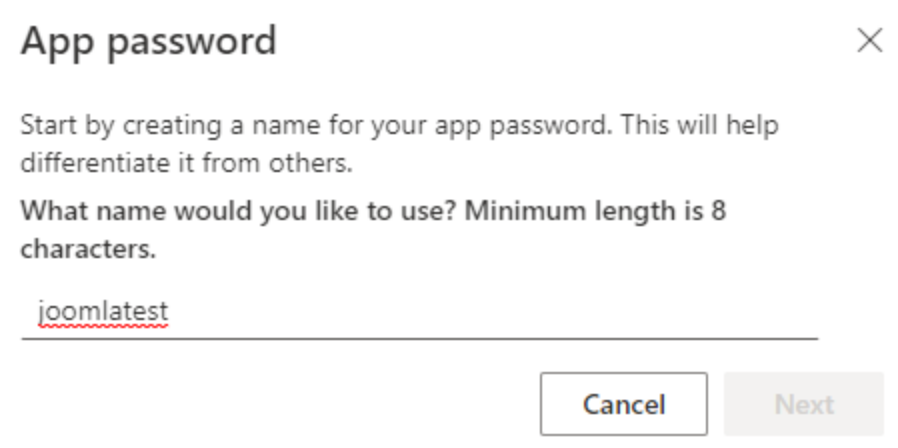
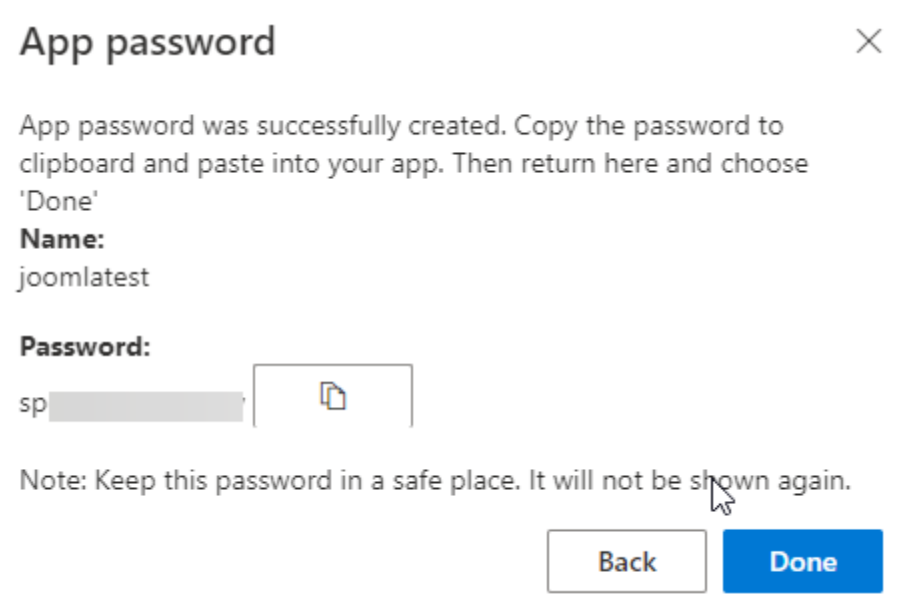
- This password will need to be named for labeling in Office 365. Use a label such as JoomlaCMS, WordPressCMS, or website.com CMS. You are limited to 16 characters. Copy this into the password field in your website CMS.
Create SMTP User - Google Workspace
- Sign into your Google account and go to your account security page.
- Under the "Signing into Google" section, click on "app password".
- If you have two-factor authentication enabled, enter your authentication code.
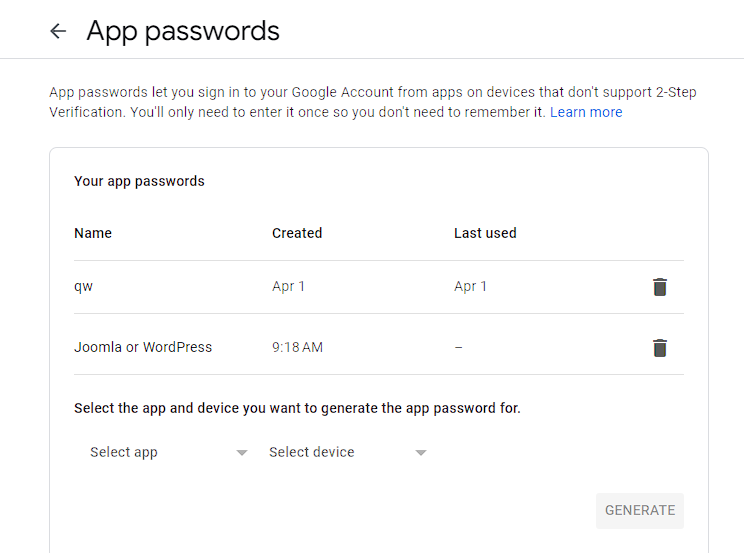
- Select "Mail" as the app and "Other (Custom name)" as the device.
- Enter a custom name for the device and click on "Generate".
- A 16-digit password will be generated.
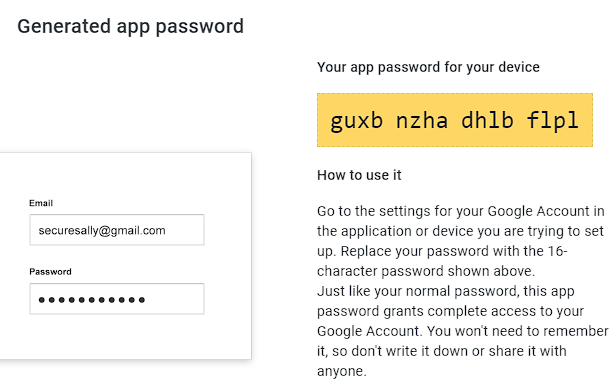
- Copy this password as you will need it for the SMTP authentication setup.
- In your email client or website settings, find the SMTP settings section and enter the following information:
- SMTP server: smtp.gmail.com
- SMTP port: 587 (or 465 if SSL/TLS is enabled)
- Encryption method: TLS (or SSL if using port 465)
- Username: your full Gmail email addressPassword: the 16-digit password you generated in step 6
- Save the settings and test the SMTP connection to ensure that it is working properly
Create SMTP User - Google Personal Account
To use your personal account with SMTP, you will need to create an App Password in Google. You will need to have 2-Step verification enabled first in order to access the app password page. This special password allows your email client or application to access your Gmail account securely. Follow the steps below to generate an App Password:
Prerequisite: Enable 2-Step Verification
App Passwords are only available if you have 2-Step Verification enabled on your Google account. If you haven't set this up yet, here's how:
- Sign in to Your Google Account
- Go to myaccount.google.com and sign in with your Google credentials.
- Navigate to Security Settings
- On the left sidebar, click on "Security".
- Enable 2-Step Verification
- In the "Signing in to Google" section, find "2-Step Verification" and click "Turn on" or "Get Started".
- Follow the on-screen instructions to set up 2-Step Verification using your phone number or authenticator app.
Steps to Generate an App Password
- Access App Passwords
- While still in the "Security" section, look for "App Passwords" under the "Signing in to Google" header.
- Alternatively, you can go directly to myaccount.google.com/apppasswords.

- Verify Your Identity
- You may be prompted to enter your Google account password again or complete a 2-Step Verification prompt.
- Select the App and Device
- In the "Select app" drop-down menu, choose "Mail". If it's not listed, select "Other (Custom name)" and enter "SMTP".
- In the "Select device" drop-down menu, choose the device you're using. If it's not listed, select "Other (Custom name)" and enter a name like "My SMTP Client".
- Generate the App Password
- Click on "Generate".
- A 16-character App Password will appear in a yellow box (e.g., abcd efgh ijkl mnop).

- Copy the App Password
- Carefully copy this password. You will use it in place of your regular password in your SMTP settings.
- Click "Done" after copying the password.
Other Mailing SMTP Services
There are several SMTP services available, some of which are free and some of which require a subscription or payment. Here are some examples of SMTP services:
- Google SMTP: Google provides SMTP service through its Google Workspace (formerly G Suite) platform, which allows users to send up to 2,000 emails per day for free. This service can be used with any email client or software that supports SMTP.
- Amazon SES: Amazon Simple Email Service (SES) is a cloud-based SMTP service that enables businesses to send email messages at scale. It offers a pay-as-you-go pricing model based on the number of emails sent.
- Mailgun: Mailgun is an SMTP service provider that specializes in email automation and delivery. It offers a pay-as-you-go pricing model based on the number of emails sent and includes features such as email tracking and analytics.
- SparkPost: SparkPost is a cloud-based SMTP service provider that offers a free plan for up to 100,000 emails per month. It also provides advanced email deliverability features and real-time analytics.
These are just a few examples of SMTP services available, and there are many more options out there. When choosing an SMTP service, it's important to consider factors such as pricing, features, and ease of use, as well as any specific requirements or limitations that may apply.
SMTP abilities supported by Joomla or WordPress
Your SMTP service will let you know what ports are available for you to use. The most used ports are:
- Port 25: This is the default port for SMTP, which is used to send unencrypted email messages over the internet.
- Port 465: This is a secure SMTP port that uses SSL/TLS encryption to secure email transmissions.
- Port 587: This is another secure SMTP port that is commonly used for email submission by email clients and web applications.
SMTP Authentication Type supported by Joomla or WordPress
- Username & Password Combination (which can be an app password)
- SMTP relay type service
- Others authentication types may be supported if you are using different SMTP plugins
Testing with Powershell
This guide will help you configure your SMTP server and send a test email using PowerShell. Replace the placeholders with your actual SMTP server details and credentials to use these scripts for testing SMTP accounts.
SMTP Server Configuration
$SMTPServer = "smtp.yourserver.com"
$SMTPFrom = "your-email@yourdomain.com"
$SMTPTo = "recipient-email@domain.com"
$MessageSubject = "Test Email"
$MessageBody = "Test"
$SMTPPort = 587  # Use 25 for unencrypted, 465 for SSL, 587 for TLS
Credentials
$SMTPUser = "your-username"
$SMTPPass = "your-password"
Convert Password to Secure String
$SecurePass = ConvertTo-SecureString $SMTPPass -AsPlainText -Force
Create Credentials
$Credential = New-Object -TypeName System.Management.Automation.PSCredential -ArgumentList $SMTPUser, $SecurePass
Send Email
Send-MailMessage -From $SMTPFrom -To $SMTPTo -Subject $MessageSubject -Body $MessageBody -SmtpServer $SMTPServer -Port $SMTPPort -Credential $Credential -UseSsl
Example Powershell Command (change bolded variables)
Send-MailMessage -From $SMTPFrom -To $SMTPTo -Subject Test -Body $MessageBody -SmtpServer $SMTPServer -Port $SMTPPort -Credential (New-Object -TypeName System.Management.Automation.PSCredential -ArgumentList $SMTPUser, (ConvertTo-SecureString $SMTPPass -AsPlainText -Force)) -UseSsl
