Directive Blogs
Tutorial: Master the Art of the Mail Merge, Part 1
Want to send out a large number of documents that are almost the same aside from a few specific areas? One example would be a letter to all of your existing clients about a new product or service, but you want each letter to address the recipient's name and company. This looks like a job for the mail merge!
Mail Merge is great for generating labels, envelopes, customized letters, and more. Let's say you are putting together a letter in Microsoft Word. First, you'll also need to prepare your contact list. If your CRM tool can export a CSV (comma separated values) file or some other spreadsheet-like format that can be pulled into Microsoft Excel, then you'll need to run through that process. You can also have the Mail Merge pull directly from your Outlook contacts, or as mentioned, create the list yourself manually. Let's run through that process first, but remember if you are just going to pull from Outlook contacts or export a CSV from your CRM application, do that instead.
- Open up a new Excel document. You'll want to store this somewhere secure on the network that gets backed up. You'll likely be using this and keeping it up to date often.
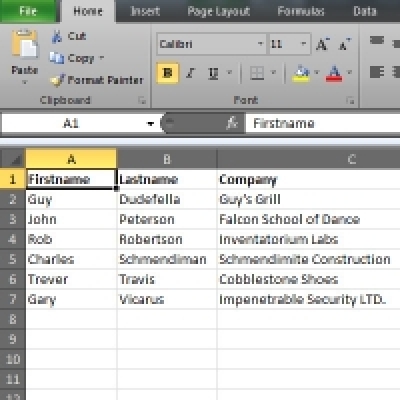
- Let's assume you'll just be needing some very basic contact information; a first name, last name and company name. You can have as many fields as you want, but let's keep it simple for this example.
- Along the top row in Excel (the 1 row) enter in your field labels (First Name under A, Last Name under B, Company under C, etc.)
- Under those field labels enter in all of the contact information for everyone you want to add to the list. Each row going down should be a new contact.
- You'll want to avoid skipping rows and columns.
- When entering data such as a postal code, make sure that column is formatted as text. Ensure this by selecting that entire column, right clicking and selecting Format Cells, and ensure the text option is selected. Otherwise you might run into issues when entering postal codes that start with zero, as Excel will assume you want them stripped out.
- Once you have your Excel document, save it. You'll need to use this when running the Mail Merge in Microsoft Word. Stay tuned to our blog, next we'll talk about how to run through the process in Word.
About the author
![]()

Comments